Saturday, December 28, 2013

Blurred Lines - Moving Bokeh

©JP Parmley
Here is a quick and fun abstract series that can lead to unlimited outcomes.

I started off taking pictures of lights to get some background pictures with colored bokeh to use in some green screen shots.  I added some camera motion and ended up with what I call "Moving Bokeh".

These shots were taken with a Canon 85mm 1.2L lens on a 5D MIII body.  Placing the lens in manual focus, the camera was set at 1/2 sec, f1.2, ISO 50.  I manually forward focused the lens slightly to get the out of focus look.   On the press of the shutter, I moved the camera with a slight wave pattern on some and straight in others.  If you want a bright dot at the end of each blurred line, start with the camera still, press the release, then move the camera.  To eliminate the bright dot, start with the camera in motion then press the release.


You don't need a 1.2 lens to replicate this.  Even with a 3.5-5.6 lens, you can create this effect.  Just zoom out, and in a manual mode, set the aperture to the lowest number (open the widest), set the shutter to about 1/2 sec, then adjust the ISO so your exposure ends up where you want it.  

Enjoy.


Tuesday, November 19, 2013

Melting Snow

©JP Parmley

I took these pictures several years ago exactly one week apart. We had a big snow fall on a Saturday morning and the following week it was nearly 50 degrees.  The quickly melting snow helped provide a foggy morning for the second shot.  They are some of the first HDR images I took and attempts to master PhotoMatrix. 

Each image was comprised of 3 exposures (-1,0,+1) with a fixed aperture.  After Photomatrix created the HDR image, I used Lightroom to boost the saturation and contrast in specific areas.

I have entered the Melting Snow picture into Rangefinder's picture contest.  

Enjoy.


Sunday, September 22, 2013

Cotton Carrier - Camera Carrying System

©JP Parmley

Over the years, I have tried various harnesses and systems to allow me to have two cameras readily available during a wedding or a nature hike.  Up until this year, I have not been happy with anything I have tried.  The Cotton Carrier 2 camera system has changed that.

I typically do not endorse products, only when they clearly stand out for me (i.e. the 5DMIII).  This system is an example where I have been so thoroughly impressed and happy that I thought I would share.

The Cotton Carrier for 2 cameras has enhanced my ability to work quickly, safely and with far less back stress.  The system keeps the cameras close to your body and locked in place until you need them.  This is not like those systems that have the cameras hanging from straps at your sides.  This system allows you to bend down, twist and turn.  Heck, their website even shows a guy on a trampoline!!

The locking mechanism keeps the cameras in place and secure, but gives you an easy method to extract them with natural motions of your hand.  In addition there are tethers that will prevent the cameras from being dropped should you accidentally let go of your gear!  This gives you the extra peace of mind of not dropping $5-$7k worth of equipment.

The harness is comfortable, adjustable and distributes the weight evenly so that you can have your larger lens with you all day.  I have not used it with anything larger than a 70-200 lens, but I imagine it will work well with the 400s as well.

I have used mine at wedding and hikes.  I actually strapped a 70-200 to a 5DMIII and went on a bike ride.  It works perfectly!

For $189 this is a great investment for pros or enthusiasts. 

Check it out HERE.

Here are some pictures from their website.


©JP Parmley


On a casual walk through a Columbus, OH park we ran across a small water hole that was swarming with mosquitoes.  As we were running past to avoid being bit, we noticed a small frog sitting on a branch that had fallen into the water.   It was quite dark and heavily shaded which created a a small challenge.  My first attempt at this picture was at 800ISO, but it required a shutter speed well slower than anything you would want to shoot hand held, even with a 70-200mm 2.8L IS lens.  

A flash would have ruined this picture, so the only solution was to leverage the high ISO range of the 5DMIII.  In a manual mode, I set the aperture to 2.8, the shutter to 1/80th and the ISO to Auto.  With spot metering, to insure the frog was properly exposed, the ISO leveled off at 2500.

Using the rule of thirds, I composed the frog in the lower right intersection and took a shooting angle that would show the branch slightly rising out of the water. Ideally I would have liked to shoot this from a tripod to allow for a slower shutter and lower ISO, but we were just taking a casual walk this outing and did not have it with us.

Notice all those mosquitoes hanging around, I think I got bit 20 times obtaining this picture.  

Enjoy,

JP

Sunday, July 28, 2013

New Partnership with Amazon.com

©JP Parmley


We have now partnered with Amazon to bring you the best selection and prices in a wide range of photography products. We have added thousands of items from the following categories.  All brands are represented including Canon, Nikon, Sony, Apple, Adobe, etc... All the accessories have also been included.
  • Cameras
  • Lenses
  • Accessories
  • Editing Software
Most all of the items ship with in 24 hours.

I have added a link on the right side bar that will take the blog readers straight to the site or you can click here.


Enjoy


JP

Tuesday, July 16, 2013

Refraction Pictures (Water Drops)

©JP Parmley


I have always been fascinated by pictures of water drops or dew drops that show the reflection of the object behind them.  Waiting for the perfect moment of dew drops can take a while so I started researching how to manufacture such a setting. 

There are a few things you need to set this shot up.  You can do this in about 10 minutes and have several unique pictures.
  1. You need a macro lens.  Preferably one that is 85mm or longer.  The longer the better.  If you have an extension tube 1.4 or 1.x it will help as well
  2. Tripod
  3. Glycerin.  I found a small bottle at Wal-Mart for about $4
  4. Calm day with plenty of daylight

Mix in a small bowl water and glycerin at about a 2:1 ratio.  You can experiment with the ratios to help insure the drop stick to your subject.  Using a syringe or eye-dropper, place drops on the stem or subject you are using.  This will take some playing around with.  I found that getting the flower stem I was using wet, helped the drops stick better.  On a windy day it can be difficult to get drops to stick so pick a calm day.

Once the drops are where you want them, place a single object about 8-12 inches behind the drops and in line with the camera on a tripod.  If your camera has a live view feature, use it and zoom in on the screen.  Manually focus on the reflection in the water drop. In an aperture priority (Av for Canon), use a smaller  aperture (larger #) to give a bigger depth of field.   As you reduce the aperture (larger #) you may find that you have to increase the distance between the drop and object behind it so it is blurred in the picture.   Use a low ISO since you are outside on a bright day and have plenty of light.

I have found that a single object works better than several.  For example a single flower vs. a bouquet.  Also note that the object behind the drop will show upside down.

If you have a shutter release cord, use it.  If your camera has a mirror lock up feature, use it.  Both will help eliminate camera shake.  Even the smallest amount will show up.  Avoid surfaces that can shake like tables, decks, etc……..use a solid surface like the ground.

Once you have the picture, zoom in and check the quality of the focus. 

Have fun!

JP

Friday, June 28, 2013

Cloud to Cloud Lightning

©JP Parmley

5DMIII, 24-70mm 2.8L, 20 sec, f/11, ISO 4000
Last night we had a small thunder cell move through that was producing a little bit of cloud to cloud lightning. We have not had any "Big" bolts lately like we have shown in previous posts.  Using the techniques from earlier posts did not produce any images due to the lack of light from the larger bolts.

So what can you do? Increase the shutter, open the aperture, or increase the ISO.  Well, since I was already at 20 and 30 seconds exposures and experimenting with increased apertures blew the clouds out, I decided to leverage the higher ISO capabilities of the 5DMIII.

These shots were take at 20 and 30 seconds at f/11 and ISO 2500 and 4000.  The ISO allowed the capture of the smaller lightning bursts inside the clouds and captured the stars as well.  I ran these through Lightroom 4 for noise reduction and cropping since the lightning was so small and far away.


5DMIII, 24-70mm 2.8L, 30 sec, f/11, ISO 2500

5DMIII, 24-70mm 2.8L, 30 sec, f/11, ISO 2500
Enjoy,

JP


Tuesday, June 11, 2013

Lightroom Vintage Effects

©JP Parmley

In just about all cases photographers are using software tools to enhance digital images.  While these tools never replace proper technique, you can achieve some stunning results with the tools available to you.


The above picture that was taken with a Canon 5D Mark III, 24-70mm 2.8L, with an off camera flash to the left.  The picture was taken at ISO 125, 1/200th, f/7.1.  I used the following steps to create the vintage picture.

1) Imported into Lightroom 4
2) Applied a saved preset
3) Made some minor adjustments to the exposure
4) Ran picture through Portrait Professional for minor touch-ups
5) Used Photoshop for minor Dodge and Burn on the dress

The key to getting this look is the preset in Lightroom.  After playing around with other pictures, I saved the settings as a preset.  I describe how to save presets in the April 4, 2013 post if you need step by step directions.

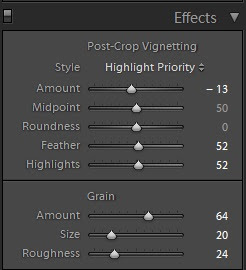
Here are the settings to this preset.


These settings should get you real close to moving the original picture to the final version.  Depending on the light source, you will have to play with the white balance to get the look you are going for.


There are lots of free presets that you can also download.  Simple searches should provide you with a wide variety of presets that you can use, edit and make your own.


Enjoy.

JP


Sunday, April 21, 2013

Golden Sun

©JP Parmley
There is nothing like that first few minutes of light from a sunrise and the last few minutes from a sunset to just make everything fall into place.  Shooting at Cox Arboretum in Miamisburg, OH this evening provided one of those opportunities.  As I type this, I have the 19x13 image coming off the Canon 9500 Mark II printer so it can be mounted in the office in the morning.


Canon 5D Mark III, 70-200mm L IS, 1/200th, f/4.5, ISO 200


Here are the elements that bring this shot together.  

1) Timing!!!!!  With about 10 minutes of light left in the day, we are seeing that "Golden Hour" color just shine through the shot.

2) The arrangement of the shot has the sun at about 10 o'clock  and low in the sky. Shooting at this angle gave the large sun flare spots just to the left of the subject.  I was shooting with a 70-200mm L IS on a 5D Mark III body to also give the shot some compression.

3) I added a fill flash just slightly off camera left

3) I added some vignetting in Lightroom 4 to help bring the focus to the center

4) The color of the dress and flowers matched

5) Finally, remember the rule of thirds!


The whole series of pictures came out amazing.

Enjoy!

JP


Saturday, April 13, 2013

Canon Lens or Coffee Mug?

©JP Parmley
Here is something only the hardcore photography fan will want......that is why I got one.  I don't normally endorse online stores but this one was too good to pass up.

It took about 3 weeks to receive it, but I think it was worth the $12.


http://nomorerack.com/daily_deals/view/310709-slr_camera_lens_stainless_steel_travel_coffee_mug_with_leak_proof_lid

Enjoy
JP

Thursday, April 4, 2013

Editing Overcast / Cloudy Pictures in Lightroom 4

©JP Parmley

Here is a quick way to convert photos taken on cold, overcast days to something a bit warmer.  This particular photo was taken in between the wedding and the reception at a local park.  It was about 35 degrees and complete overcast.  Because of the cold temperature, we were trying get a few quick pictures. 

For this example I used Lightroom 4, my primary workflow tool for color, exposure, and noise editing.  I have created a preset that I apply to pictures taken in this type of situation.  I can then fine tune them to meet the specific pictures needs.

The preset has the following settings:

Contrast +33
Highlights -88
Shadows +45
Whites -34
Blacks +34
Clarity +7
Vibrance +7
Saturation +8


 To create the preset in Lightroom, set the sliders where you want them, then click the "+" icon above the preset pane.  Give it whatever name you want, then it will be available for you to apply on future pictures. I have also added a little vignette after the fact as well.

In a perfect world, I would have adjusted the white balance to a set of portable strobes and reflectors, but the wind was blowing making the wind chill probably in the low teens. With us just getting a few pics, we opted to edit the look after the fact and save the bride from freezing in her strapless dress.

After
Before


Enjoy

JP


Saturday, March 30, 2013

Turning an Overcast Sky Blue

©JP Parmley

I recently had someone ask me how to turn an overcast sky blue.  If you have trees that you can see through and they are high above the horizon, this can be very tricky.  But if they are low, like the example below, there are several methods you can use to get the affect, but one simple way for even novice Photoshop users is to add a blue gradient fade.

First, use any selection tool to select just the sky.  Don't worry about being perfect around the horizon because the blue will be fading to transparent at that point.   Once you have the selection, choose the gradient tool and put it in a color to transparent and linear mode  (see red arrows). Then select a light blue for your top color.

Then use the gradient tool drawing from the top of the picture to about 3/4 way down the selected sky.  If you do not like the result, try drawing longer or shorter lines.  Just be aware that this tool is additive.  If you do not like the first result, undo it.  If you keep using the tool on top of an existing blue gradient fade, it keeps adding to the blue.

Try playing with different shades of blue and opacity. 

Enjoy.
  
Original Picture with Overcast Sky


Use the this mode for the gradient tool


Blue sky added.

Sunday, March 10, 2013

Canon 5D Mark III - High ISO

©JP Parmley

Ever tried getting that picture of something in motion in low light, without a flash?  When I upgraded the 5D Mark IIs to Mark IIIs, I did so specifically for the higher ISO range and the 61 point focus system.  The picture below may not look like a stellar professional picture, but once you realize the situation, you will find how amazing it is that this picture is even visible.

Before I give you all the details or you cheat and look to the end, decide what you think the settings were for this picture.  I will tell you that the subject is moving at about 15 mph and the aperture was 2.8.  As you can see this is an indoor, poorly lit race track.


I suspect that you may be thinking that it was taken at about 1/30-1/60th, f/2.8, ISO around 1600-3200.  This setting range would be consistent with many photos of this type of shot.  However, take a closer look at the hair and the wheels.  You can see that the motion has been stopped......you can even see the valve stem of the rear wheel.  So now we know the shutter was much faster than 1/60th, otherwise it would be blurred from the motion.

In fact, I intentionally pushed the limits of this picture by setting the shutter to 1/500th and put the ISO on an Auto setting. This would push the ISO to an extreme.  I could have shot this at about 1/200th and had almost the same result with a lower ISO and a much lower noise level.  But I wanted to show what pushing the Mark III would do.  The 1/500th shutter pushed the ISO to 12,800!  

Now, I would normally slow the shutter down a little to bring the ISO down, but for demonstration purposes, I wanted to see the performance.  If you would have wanted an ISO in the 1600-3200 range, you would have had to have a much slower shutter and would have had extreme motion blur.  The bottom line is that you could not have gotten this fast shutter shot with out the high ISO performance.

So here is one crude example of the high ISO performance of the 5D Mark III. Try taking a picture at ISO 12,800 on a Mark II or 7D and see what happens. Wedding season is just around the corner, in fact it starts next week in Cincinnati for us. This camera is a game changer as most reviews have said.  I am very much looking forward to the new creative modes this opens up.

Enjoy.


Saturday, March 9, 2013

Canon EF 24-70mm f/2.8L II USM review

©JP Parmley


Dpreview.com has completed their review of the the Canon EF 24-70mm f/2.8L II lens.  They describe it as

.."a near-flawless lens with optics that come very close to matching a set of top-quality primes. With fast, accurate auto focus and weather-sealed construction, it's difficult to find any really serious faults at all."

Check out the full review: Canon EF 24-70mm f/2.8L II Review

Thursday, March 7, 2013

Smoke on the Water

©JP Parmley

Smoke on the Water

Here is a quick edit to one of the smoke pictures taken last year.  I was looking to add a little more color and a shadow.  But after I was done experimenting in Photoshop Elements, I ended up with something a little more dramatic.

I started off in Photoshop with the original picture.  After I rotated it, I made independent selections and feathered them about 40 pixels before I added the hue and saturation adjustments.  Once I had the colors where I wanted them, I then applied a flood filter from Flaming Pear.  You can a get this filter here.  http://www.flamingpear.com/flood.html

Original Picture

Adjusted Hue and Saturation

Flaming Pear Flood Filter

The adjustments I made are shown in the picture to get the effect I landed on.  After the water effect was added, I imported the final picture into Lightroom and began some light sharpening and color saturation local adjustments.  It took about 10 minutes to finalize the edits.

I'm still waiting for the weather to break.  We have lots of engagement and wedding shoots to complete going into spring!

Enjoy!

Saturday, February 23, 2013

Canon 7D Mark II?


©JP Parmley
Take a look at a recent article at canonrumors.com.  What will the next generation 7D look like? They speculate the following:


Specifications
  • 24.1mp APS-C Sensor
  • Dual DIGIC V
  • 10fps
  • Dual Memory Card Slots (Unknown configuration)
  • 61 AF Points (I wonder if we’ll get red focus points in AIS?)
  • 3.2″ LCD
  • Build quality like 5D3
  • GPS & Wifi
  • $2199 ($500 more than the 7D at launch, I’d like to see such a camera come in under $2000)
  • ISO Performance to get close to the 5D3
  • “Lots of video features”

http://www.canonrumors.com/2013/02/canon-eos-7d-mark-ii-spec-list-cr2/